
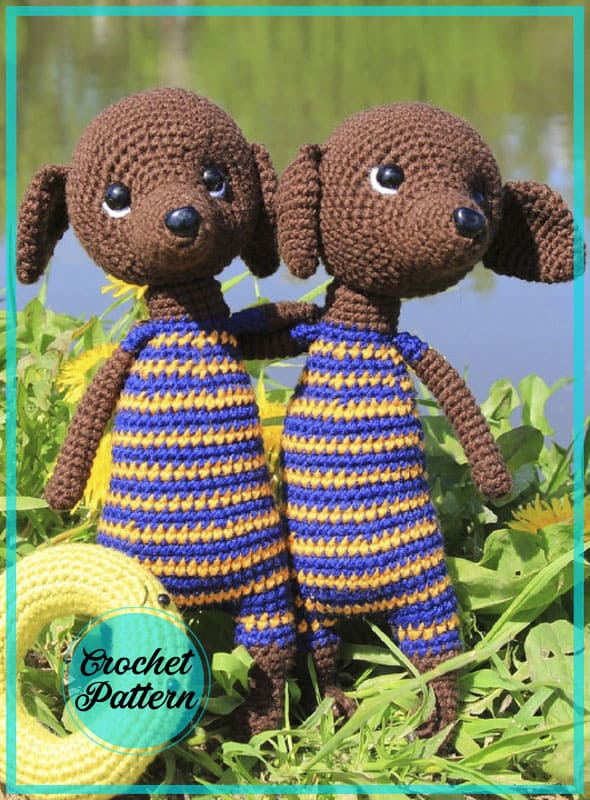
Hello dear friends. Today I will share a very cute crochet dog amigurumi pattern. Pretty cute dogs like two friends! It’s pretty cute in colors. Although the length of the pattern is a little too long, it is quite easy to make. There aren’t many crochet techniques. You can easily make it with simple crochet techniques. Developing yourself with such simple amigurumi patterns will be very useful in your next projects. The more you crochet, the more your hand gets used to it. You can create much faster and more successful works. It’s all about your time. The pattern is completely free. The pattern has all the details. Now let’s crochet the dog amigurumi step by step.
Materials
Gazzal baby cotton 165 m, 50 g, 40% acrylic, 60% cotton
Main color: 3436
Swimsuit color: 3438
Stripe color: 3416
Circle color 3457
Hook number 2
Filler
Safety eyelets 10 mm and 5 mm
Nose on a secure mount
Blunt tip sewing needle
White yarn for the decoration of the muzzle
yarns for making a circle
Cotter pin and 2 discs 2 cm each
Abbreviations
AR – Amigurumi Magic ring
LL: Lifting loop Click for mean!
MR – Amigurumi Magic ring
App – application
sc : Single Crochet
inc : Increase
dec : Decrease
tr : Triple Crochet/ Treble Crochet
st: Stitch
dc : Double Crochet
hdc: Half Double Crochet
sl-st : Slip Stitch
ch : Chain
..in : make increase into same stitch as many as the number which is given in front of “inc” abbreviation (exp; 3inc, 4inc..).
FLO : Crochet into front loops only
BLO : Crochet into back loops only
BL : Bobble Stitch – do 5dc all in the same stitch and then yarn over and pull through all the loops on your hook (the original loop + 1 loop for each partially completed dc)
Ears (2 parts)
We crochet in brown.
1) 6 sc in MR
2) 6 sc
3) 6 inc (12 sc)
4) 12 sc
5) (3 sc, inc)х3 (15 sc)
6) 15 sc
7) (4 sc, inc)х3 (18 sc)
8) (2 sc, inc)х6 (24 sc)
9-10) 24 sc – 2 rounds
11) (2 sc, dec)х6 (18 sc)
12) 18 sc
13) Fold the piece in half and sew at both ends 9 sc.
14) We make an air loop, then we crochet: dec, 5 sc, dec.
We fasten the yarn, leave the end for sewing on the part.
Tail
We crochet in brown.
1) 6 sc in MR
2-6) 6 sc – 5 rounds
Fasten the yarn, leave a long end for sewing on the part.
Hands (2 parts)
We crochet in brown.
1) 6 sc in MR
2) (1 sc, inc)х3 (9sc)
3-17) 9 sc – 15 rounds
Change the yarn to the color of the swimsuit.
18-19) 9 sc – 2 rounds
20) Fold the hand in half and crochet 4 sc at both ends.
We fix the yarn, leave the long end for sewing on the part.
Legs (2 parts)
We begin to crochet in brown.
1) 6 sc in MR
2) (1 sc, inc)х3 (9 sc)
3-4) 9 sc – 2 rounds
5) 1 sc, 2 dec, 4 sc (7 sc)
6) 1 sc, dec, 4 sc (6 sc)
7-8) 6 sc – 2 rounds
9) (1 sc, inc)х3 (9 sc)
10) (2 sc, inc)х3 (12 sc)
11) 12 sc
We tie the required number of columns to the middle of the front. Cut the yarn. Change to the color of the swimsuit.
12-13) 12 sc – 2 rounds
Change the yarn to the color of the stripes.
14) (3 sc, inc)х3 (15 sc)
Cut the yarn on the first leg, continue crochetting on the second. We stuff the legs tightly.
Body
We collect 6 ch from the second leg, attach it to the first.
1) 15 sc on the 1st leg, 6 sc on the air loops, 15 sc on the 2nd leg, 6 sc on the air loops. (42 sc)
2) 42 sc
Move the beginning of the row to the side of the body (about 8 sc). Change the color to orange. We crochet all rows further by alternating these two colors: 1 row is orange, 2 – blue.
3) О: 42 sc
4-5) С: 42 sc – 2 rounds
6) О: 42 sc
7-8) С: 42 sc – 2 rounds
9) О: 42 sc
10) С: (5 sc, dec)х6 (36 sc)
11) С: 36 sc
12) О: 36 sc
13-14) С: 36 sc – 2 rounds
15) О: 36 sc
16-17) С: 36 sc – 2 rounds
18) О: 36 sc
19-20) С: 36 sc – 2 rounds
21) О: 36 sc
22) С: (4 sc, dec)х6 (30 sc)
23) С: 30 sc
24) О: (3 sc, dec)х6 (24 sc)
25-26) С: 24 sc – 2 rounds
27) О: (2 sc, dec)х6 (18 sc)
28-29) 18 sc – 2 rounds
Change the color to brown.
30-33) 18 sc – 4 rounds
Insert the cotter pin to fit. I have it 2 cm.
34) (1 sc, dec)х6 (12 sc)
35) 6 dec.
Fasten the yarn, hide the tip.
Head
We crochet in brown.
1) 6 sc in MR
2) 6 inc (12 sc)
3-4) 12 sc – 2 rounds
5) (3 sc, inc)х3 (15 sc)
6-9) 15 sc – 4 rounds
10) 3 sc, inc, 1 sc, 5 inc, 1 sc, inc, 3 sc (22 sc)
11) 22 sc
12) 5 sc, 2 inc, 8 sc, 2 inc, 5 sc (26 sc)
13) 7 sc, (1 sc, inc)х6, 7 sc (32 sc)
14) (3 sc, inc)х8 (40 sc)
15) (3 sc, inc)х10 (50 sc)
Insert the nose between rows 2 and 3 and the eyes between rows 13 and 14.
16-24) 50 sc – 9 rounds
25) (8 sc, dec)х5 (45 sc)
26) (7 sc, dec)х5 (40 sc)
27) (6 sc, dec)х5 (35 sc)
28) (5 sc, dec)х5 (30 sc)
We attach the head to the cotter pin.
We select the disk by size. The cotter pin passes:
If you want your dachshund’s nose to point upwards, between rows 20 and 21.
If you want the dachshund’s nose to point straight ahead, between rows 16-17.
29) (4 sc, dec)х5 (25 sc)
30) (3 sc, dec)х5 (20 sc)
31) (2 sc, dec)х5 (15 sc)
32) (1 sc, dec)х5 (10 sc)
33) 5 dec.
Close the hole. Fasten the yarn and hide the end.
Circle frog
We crochet in green.
We collect 45 air loops.
1-4) 45 sc – 4 rounds
5) ( 8 sc, inc)х5 (50 sc)
6) (4 sc, inc)х10 (60 sc)
7-10) 60 sc – 4 rounds
We insert eyes anywhere.
11) (4 sc, dec)х10 (50 sc)
12) (8 sc, dec)х5 (45 sc)
13-15) 45 sc – 3 rounds
Sew the edges inside the circle, fill them tightly in the process. Then we embroider a smile with yarns.
The lifebuoy is ready!
Assembly
We make an eye tightening. We insert the needle into the head, withdraw it from the left side of the left eye, insert the needle to the right of the left eye, withdraw it to the left near the right eye, insert it to the right near the right eye, withdraw it from the head. We pull it to the type of muzzle you like, fix it, hide the yarns inside the head.
We embroider squirrels around the eyes with a white yarn.
Sew on the ears in any way: just sew “flat” or make them look more like the ears of a dachshund, sew them so that they stand “on the leg”.
Sew the tail and arms to the body.
Our dachshund is ready!
Tag me on finished works or put a hashtag under them