
Abbreviations
ch-chain
sc-single crochet
inc-increase
dec-decrease
hdc-half double crochet
hdc2tog-half double crochet two together
fo-fasten off
Supplies
2.5mm crochet hook
8mm safety eyes
Red Heart comfort yarn in shade Art (green), Red Heart super saver yarn in yellow, blue, purple, red, grey, brown, light brown and white
1.25mm hook and red embroidery thread to make the pepperoni
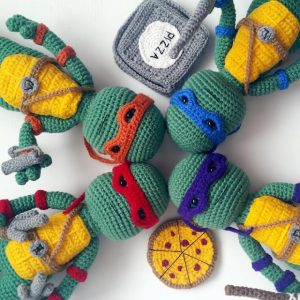
**Special note: I used just the one turtle pattern below to make all four turtles**
Head
Rnd1: Starting at the top of your turtles head with green yarn sc x 6 in an adjustable ring (6)
Rnd2: Inc x 6 (12)
Rnd3: Inc x 12 (24)
Rnd4: Sc x 24 (24)
Rnd5: [Sc, inc] x 12 (36)
Rnd6-11: Sc x 36 (36)
Rnd12: Sc x 3, [sc x 8, dec] x 3, sc x 3 (33)
Rnd13: You will be inserting the safety eyes in this round. sc x 11, place a safety eye in the stitch you just did or a stitch marker so you can go back and insert the eye later, sc x 7, place a safety eye in the last stitch you just did, sc x 15 (33)
Rnd14: Sc x 5, inc x 3, sc x 11, inc x 3, sc x 11 (39)
Rnd15: Sc x 7, inc x 3, sc x 13, inc x 3, sc x 13 (45)
Rnd16-17: Sc x 45 (45)
Rnd18: Sc x 8, dec, sc x 2, dec, sc x 15, dec, sc x 2, dec, sc x 10 (41)
Rnd19-22: Sc x 41 (41)
Rnd23: Sc, dec x 20 (21)
Rnd24: Sc, dec x 10 (11)
Rnd25: Stuff head firmly, sc, dec x 5 (6)
Rnd26: Dec x 3, fo (3)
Body
Rnd1: Starting at the neck with green yarn ch x 24 and join (24)
Rnd2-5: Sc x 24 (24)
Rnd6: [Sc x 3, inc] x 6 (30)
Rnd7-9: Sc x 30 (30)
Rnd10: Sc x 5, inc x 5, sc x 9, inc x 5, sc x 6 (40)
Rnd11-13: Sc x 40 (40)
Rnd14: Sc x 9, dec, sc x 2, dec, sc x 12, dec, sc x 2, dec, sc x 7 (36)
Rnd15-18: Scx 36 (36)
Rnd19: You will now be starting the first leg, sc, skip 18 stitches, sc x 17 (18)
Rnd20-23: Sc x 18 (18)
Rnd24: [Sc x 4, dec] x 3 (15)
Rnd25-32: Sc x 15 (15)
Rnd33: You will now be starting the calf, sc x 13, inc x 2 (17)
Rnd34: Inc x 2, sc x 15 (19)
Rnd35-39: Sc x 19 (19)
Rnd40: [Sc, dec] x 2, sc x 11, dec (16)
Rnd41: Dec, sc x 14 (15)
Rnd42-44: Sc x 15, fo (15)
Toe/Foot (make 2 toes per leg)
Rnd1: With green yarn sc x 6 in an adjustable ring (6)
Rnd2: [Inc, sc x 2] x 2 (8)
Rnd3-5: Sc x 8 (8)
Rnd6: Inc, sc x 7, fo (9)
**Please note, DO NOT fo when you are working on the second toe. Continue onto Rnd7 below**
Rnd7: Now you have both toes made and you will now continue on to making your foot. Hold both toes together and sc around both toes x 18 (18)
Rnd8: Sc x 18 (18)
Rnd9: Sc [sc, dec] x 5, sc x 2 (13)
Rnd10-13: Sc x 13 (13)
Rnd14: Sc, dec x 6 (7)
Rnd15: Stuff your foot firmly, now dec x 3, fo (3)
**Repeat for the second foot**
Second Leg
Rnd1: With the back of your doll facing you upside down sc in the first stitch to the left of the first leg, sc x 17 (18)
Rnd2-3: Sc x 18 (18)
Rnd4: [Sc x 4, dec] x 3 (15)
Rnd5-14: Sc x 15 (15)
Rnd15: Sc x 5, inc x 4, sc x 6 (19)
Rnd16-20: Sc x 19 (19)
Rnd21: Sc x 6, dec x 3, sc x 7 (16)
Rnd22: Sc x 6, dec, sc x 8 (15)
Rnd23-26: Sc x 15, fo at the end of Rnd26 (15)
Finger/Arm (make 2 per arm)
Rnd1: With green yarn sc x 6 in an adjustable ring (6)
Rnd2: Inc, sc x 5 (7)
Rnd3: Sc x 7 (7)
Rnd4: Dec, sc x 5 (6)
Rnd5: Sc x 6, fo (6)
**Please note, DO NOT fo when you are working on the second finger. Continue onto Rnd6 below**
Rnd6: Hold both fingers together and sc around both of them x 12 (12)
Rnd7-9: Sc x 12 (12)
Rnd10: [Sc x 2, dec] x 3 (9)
Rnd11-19: Sc x 9 (9)
Rnd20: Sc, [sc x 3, inc] x 2 (11)
Rnd21-24: Sc x 11 (11)
Rnd25: Sc, [sc x 3, dec] x 2 (9)
Rnd26-27: Sc x 9, fo at the end of Rnd27 (9)
Thumb (make 2)
Rnd1: With green yarn sc x 6 in an adjustable ring (6)
Rnd2-4: Sc x 6, fo at the end of Rnd4 (6)
Front Of Turtle Shell
Row1: With yellow yarn ch x 10 (10)
Row2: Turn, ch, sc x 9 (9)
Row3: Turn, ch, inc, sc x 7, inc (11)
Row4: Turn, ch, sc x 11 (11)
Row5: Turn, ch, inc, sc x 9, inc (13)
Row6-10: Turn, ch, sc x 13 (13)
Row11: Turn, ch, dec, sc x 9, dec (11)
Row12-16: Turn, ch, sc x 11 (11)
Row17: Turn, ch, dec, sc x 7, dec (9)
Row18: Turn, ch, dec, sc x 5, dec (7)
Rnd19: Do not turn, sc around the entire piece, fo
Back Of Turtle Shell
Row1-18: With brown yarn work the same as the front of your turtle shell. Place a stitch marker in the last stitch of Row18
Rnd19: Do not turn, sc around the entire piece to the stitch before the stitch marker x 50 (50)
Rnd20-21: Sc x 51, fo at the end of Rnd21 (51)

Headband
Row1: With the colour yarn of your choice ch x 30 (30)
Row2: Turn, sc x 29 (29)
Row3: Turn, ch, sc x 9, ch x 7, skip 3 stitches, sc x 5, ch x 7, skip 3 stitches, sc x 9 (37)
Row4: Turn, ch, sc x 9, sc x 7 in ch7 space, sc x 5, sc x 7 in ch7 space, sc x 9, fo (37)
Elbow Wrap (make 2)
Row1: With the colour yarn of your choice ch x 14 (14)
Row2 Turn, sc x 13, fo (13)
Wrist Wrap (make 2)
Row1: With the colour yarn if your choice ch x 17 (17)
Row2: Turn, sc x 16, fo (16)
Knee Wrap (make 2)
Row1: With the colour yarn of your choice chx 23 (23)
Row2: Turn, sc x 22, fo (22)
Stomach Belt
Row1: With light brown yarn ch x 52 (52)
Row2: Turn, sc x 51, fo (51)
Shoulder Strap For Belt
Row1: With light brown yarn ch x 38, fo (38)
Belt Buckle
Rnd1: With white yarn sc x 6 in an adjustable ring (6)
Rnd2: Inc x 6, fo (12)
Sitck
Rnd1: With brown yarn sc x 5 in an adjustable ring (5)
Rnd2-34: Sc x 5, fo at the end of Rnd34 (5)
Nunchuk (make 2)
Rnd1: With grey yarn sc x 6 in an adjustable ring (6)
Rnd2: [Inc, sc] x 3 (9)
Rnd3: Sc in back loop x 9 (9)
Rnd4: Sc x 3, dec, sc x 4 (8)
Rnd5-14: Sc x 8, fo at the end of Rnd14 (8)
End Of Nunchuk (make 2)
Rnd1: With grey yarn sc x 6 in an adjustable ring, fo (6)
Chain On Nunchuk (male 2)
Row1: With grey yarn ch x 17, fo (17)
Sword (make 2)
Rnd1: With grey yarn sc x 5 in an adjustable ring (5)
Rnd2-6: Sc x 5 (5)
Rnd7: Inc, sc x 4 (6)
Rnd8-13: Sc x 6 (6)
Rnd14: Inc, sc x 5 (7)
Rnd15: Sc x 7 (7)
Rnd16: Sc x 3, inc, sc x 3 (8)
Rnd17-27: Sc x 8 (8)
Rnd28: [Sc x 3,inc] x 2 (10)
Rnd29: Sc x 10 (10)
Rnd30: Change to brown yarn and sc x 10 (10)
Rnd31: [Inc, sc x 4] x 2 (12)
Rnd32-34: Sc x 12 (12)
Rnd35: Dec, sc x 10 (11)
Rnd36: Dec, sc x 9, fo (10)
Bottom Of Sword
Rnd1: With brown yarn sc x 6 in an adjustable ring (6)
Rnd2: [Inc, sc ] x 2, fo (8)
Trim On Sword
Row1: With brown yarn ch x 13 (13)
Row2: Turn, sc x 12 (12)
Row3: Turn, ch, sc x 12, fo (12)
Sais (large, middle prong)
Rnd1: Starting with the middle prong with grey yarn sc x 6 in an adjustable ring (6)
Rnd2: Inc, sc x 5 (7)
Rnd3-12: Sc x 7, fo at the end of Rnd12 (7)
Sais (little prong, make two per sais)
Rnd1: With grey yarn sc x 6 in an adjustable ring (6)
Rnd2-6: Sc x 6, fo at the end of Rnd6 on the first prong ONLY (6)
****Please note, DO NOT fo when you are working on the second prong. Continue onto Rnd7 below**
Rnd7: Hold all three prongs together and sc around all three x 15 (15)
Rnd8: Sc x 15 (15)
Rnd9: Change to brown yarn and [sc x 3, dec] x 3 (12)
Rnd10: Sc x 12 (12)
Rnd11: [Sc, dec] x 4 (8)
Rnd12-14: Sc x 8, fo at the end of Rnd14 (8)
Bottom Of Sais
Rnd1: With brown yarn sc x 6 in an adjustable ring, fo (6)
Trim On The Sais
Row1: With brown yarn ch x 14 (14)
Row2: Turn, sc x 13, fo (13)
Pizza Crust
Rnd1: With light brown yarn sc x 6 in an adjustable ring (6)
Rnd2: Inc x 6 (12)
Rnd3: [Sc, inc] x 6 (18)
Rnd4: [Inc, sc] x 9 (27)
Rnd5: Sc x 27 (27)
Rnd6: [Sc x 2, inc] x 9 (36)
Rnd7: [Sc, inc] x 18 (54)
Rnd8: Sc x 54 (54)
Rnd9: Sc in back loop x 54 (54)
Rnd10: [Sc x 4, inc] x 10, sc x 3, inc (65)
Rnd11: Sc x 65, fo (65)
Cheese
Rnd1: With yellow yarn sc x 6 in an adjustable ring (6)
Rnd2: Inc x 6 (12)
Rnd3: [Sc, inc] x 6 (18)
Rnd4: [Sc, inc, sc] x 6 (24)
Rnd5: [Sc x 3, in] x 6 (30)
Rnd6: [ Sc x 4, inc] x 6, fo (36)
Pepperoni (small pieces)
Rnd1: With a 1.25mm crochet hook and embroidery thread sc x 6 in an adjustable ring, fo (6)
Pepperoni (large pieces)
Rnd1: Work the same as the small pepperoni slice
Rnd2: Inc x 6, fo (12)
Pizza Box
Row1: With grey yarn ch x 23 (23)
Row2: Turn, hdc x 22 (22)
Row3-15: Turn, ch, hdc x 22, place a stitch marker in the last stitch of Row15 (22)
Rnd16: Do not turn, sc around the entire piece to the stitch before the stitch marker x 80 (80)
Rnd17: Do this entire round in the back loops, hdc x 10, hdc2tog, hdc x 12, hdc2tog, hdc x 12, hdc2tog, hdc x 10, hdc2tog, hdc x 15, hdc2tog, hdc x 6, hdc2tog, hdc x 3 (74)
Rnd18: Hdc x 74 (74)
Row19: Now you will be starting the lid, hdc, turn, ch, hdc in front loop x 17 (18)
Row20-31: Turn, ch, hdc x 17, fo at the end of Row31 (17)
Trim on the pizza box lid
Rnd1: Now insert your hook into one corner of the top of the pizza box and sc around the entire lid of the pizza box x 55(55)
Rnd2: Sc in front loop x 55 (55)
Rnd3-4: Sc x 55, fo at the end of Rnd4 (55)
Circle On The Front Of The Pizza Box
Rnd1: With white yarn sc x 6 in an adjustable ring (6)
Rnd2: Inc x 6 (12)
Rnd3: [Inc, sc] x 6 (18)
Rnd4: [Sc x 2, inc] x 6 (24)
Rnd5: [Sc x 3, inc] x 6 (30)
Rnd6: [Sc x 2, inc, sc x 2] x 6 (36)
Rnd7: Sc x 3, [sc x 2, inc] x 10, sc x 3, fo (46)
Assembly
For the turtle Stuff the body then sew the head onto the body. Sew on the feet and arms. Sew on the front and back turtle shell, and the belt and shoulder strap. Sew on the ankle, wrist and knee wraps. Embroider on eyebrows and a mouth. For the accessories sew on the bottoms, trims and handles. For the pizza sew the pepperoni onto the cheese, sew the cheese onto the crust. Sew on black lines to make the slices. Sew the word “pizza” onto the white circle, then sew the circle onto the lid of your pizza box.


