Designer : Ana Veiga
Instagram: @faerie_stitches
Hello everyone who loves amigurumi…
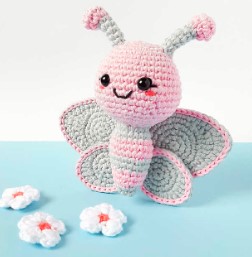
Today I shared the amigurumi butterfly crochet pattern for you. Below you will find a step-by-step tutorial of this pattern and you will complete it without any difficulty. Thanks to the creator for this cute pattern.
Amigurumi cats, amigurumi dolls, amigurumi dogs, amigurumi unicorns, amigurumi lambs, amigurumi dinosaurs, amigurumi foxes, amigurumi bears, amigurumi giraffes, amigurumi pigs, amigurumi birds, amigurumi bunny, amigurumi elephants, amigurumi hippos, amigurumi monkeys… All the amigurumi toy crochet patterns and ideas you are looking for are here. Have a great time…
Materials
Worsted Yarn (I used Drops you #8 in light lilac and grey, as well as old pink for the embroidery). One ball of each color should be enough.
Crochet hook (I used 2.5mm).
Stuffing
Black embroidery thread
Embroidery/tapestry needle
Stitch markers
Note about color changes
When the pattern indicates a color change, it’s important to remember that the yarn change starts one stitch earlier: in the stitch before the color change, insert hook, yarn over and pull loop through stitch using the old color; then yarn over in the new color and pull loop through both loops on hook. The yarn of the color you aren’t using is carried from behind. Color changes are indicated by the new color inside parentheses ().
Abbreviations
AR – Amigurumi Magic ring
MR – Amigurumi Magic ring
App – application
ll – lift loop
sc : Single Crochet
inc : Increase
dec : Decrease
tr : Triple Crochet/ Treble Crochet
st: Stitch
dc : Double Crochet
hdc: Half Double Crochet
sl-st : Slip Stitch
ch : Chain
..in : make increase into same stitch as many as the number which is given in front of “inc” abbreviation (exp; 3inc, 4inc..).
FLO : Crochet into front loops only
BLO : Crochet into back loops only
BL : Bobble Stitch – do 5dc all in the same stitch and then yarn over and pull through all the loops on your hook (the original loop + 1 loop for each partially completed dc).
*If made with the described materials, the toy will be about 13cm / 5.1 inches tall, from the tip of the antennas to the bottom.

ELLIE THE BUTTERFLY CROCHET FREE PATTERN
Head and Body
(light lilac)
Rnd 1: start 6 sc in a magic ring (6)
Rnd 2: inc in all 6 st (12)
Rnd 3: (sc in next st, inc in next st) x 6 (18)
Rnd 4: sc in next st, inc in next st, (sc in next 2 st,
inc in next st) x 5, sc in next st (24)
Rnd 5: (sc in next 3 st, inc in next st) x 6 (30)
Rnd 6: sc in all 30 st (30)
Rnd 7: sc in next 2 st, inc in next st, (sc in next 4
st, inc in next st) x 5, sc in next 2 st (36)
Rnd 8-9: sc in all 36 st (36)
Rnd 10: (sc in next 5 st, inc in next st) x 6 (42)
Rnd 11: (sc in next 13 st, inc in next st) x 3 (45)
Rnd 12: sc in all 45 st (45)
Rnd 13: (sc in next 13 st, dec) x 3 (42)
Rnd 14: (sc in next 5 st, dec) x 6 (36)
Rnd 15: sc in all 36 st (36)
Rnd 16: sc in next 2 st, dec, (sc in next 4 st, dec) x
5, sc in next 2 st (30)
Rnd 17: (sc in next 3 st, dec) x 6 (24)
Rnd 18: sc in next st, dec, (sc in next 2 st, dec) x 5, sc in next st (18)
Insert the safety eyes between rounds 10 and 11, about 6 stitches apart. Embroider the face details:
1. Embroider the lashes.
Pull the embroidery thread to the front and to the back of the fabric in the indicated places, and guide it to the proper shape by placing a pin in the corner of the eye. Secure the thread to the place where the pin is, by coming out and going back into the same stitch with the thread tail.
2. Embroider the cheeks one round under the eyes.
3. Embroider the mouth.
Pull the embroidery thread to the front and to the back of the fabric in the indicated places, and guide it with two pins. Sew the points where the pins are, by coming out and going back into the same stitch with the thread tail.
Stuff the head, and continue crocheting the head and body
Rnd 19: (sc in next st, dec) x 6 (12)
(grey)
Rnd 20: (sc in next st, inc in next st) x 6 (18)
Rnd 21: (sc in next 5 st, inc in next st) x 3 (21)
(lilac)
Rnd 22-24: sc in all 21 st (21)
(grey)
Rnd 25: (sc in next 5 st, dec) x 3 (18)
Rnd 26: sc in all 18 st (18)
(lilac)
Rnd 27: sc in next 2 st, dec, (sc in next 4 st, dec)
x 2, sc in next 2 st (15)
Rnd 28: sc in all 15 st (15)
Rnd 29: (sc in next 3 st, dec) x 3 (12)
Stuff the body.
(grey)
Rnd 30: sc in all 12 st (12)
Rnd 31: dec x 6 (6)
Fasten off and leave a long tail. With the embroidery needle, weave the yarn tail through the front loop of each stitch and pull to close.
Weave in the yarn tail.
Lower Wings
(grey)
Rnd 1: start 6 sc in a magic ring (6)
Rnd 2: inc in all 6 st (12)
Rnd 3: (sc in next st, inc in next st) x 6 (18)
Rnd 4: sc in next st, (inc in next st, sc in next 2 st) x 2, 2 hd in next st, 2 dc in next st, 2 tr in next st, 2 dc in next st, 2 hd in next st, sc in next 2 st, inc in next st, sc in next 3 st (26)
(light lilac)
Rnd 5: slst in all 26 st (26)
Fasten off and leave a long tail for sewing. Make two lower wings.

Upper Wings
(grey)
Rnd 1-3: repeat pattern for lower wings.
Rnd 4: sc in next st, inc in next st, (sc in next 2 st, inc in next st) x 5, sc in next st (24)
Rnd 5: (sc in next 3 st, inc in next st) x 2, sc in next 3 st, 2 hd in next st, (dc, tr) in next st, tr in next st, (tr, dc) in next st, 2 hd in next st, (sc in next 3 st, inc in next st) x 2 (32)
Rnd 6: sc in next 2 st, inc in next st, (sc in next 4 st, inc in next st) x 2, hd in next 2 st, dc in next st, (hd, dc) in next st, 2 tr in next st, (dc, hd) in next st, dc in next st, hd in next 2 st, (inc in next st, sc in next 4 st) x 2 (40)
(light lilac)
Rnd 7: slst in all 40 st (40)
Fasten off and leave a long tail for sewing. Make two upper wings.
Sew the wings to the back of the body, first the lower wings between rounds 25 and 30, pointing slightly downwards, and then the upper wings between rounds 20 and 24, pointing slightly upwards. Make sure that the upper and lower wings overlap, and that they’re directly opposite to the face.
Antennas
(light lilac)
Rnd 1: start 6 sc in a magic ring (6)
Rnd 2: inc in all 6 st (12)
Rnd 3: sc in all 12 st (12)
Rnd 4: dec x 6 (6)
(grey)
Rnd 5-9: sc all 6 st (6)
Fasten off and leave a long tail for sewing. Make two antennas.
Sew each antenna to the top of the head, over rounds 4 and 5. Make sure they are aligned with the face. The antennas don’t need to be stuffed.
Congratulations, you have completed the amigurumi Ellie the butterfly pattern.
More amigurumi butterfly ideas:


